Doodle To 3D Render – Cities Of The Imagination
Turn A Doodle to 3D Render – Cities Of The Imagination…
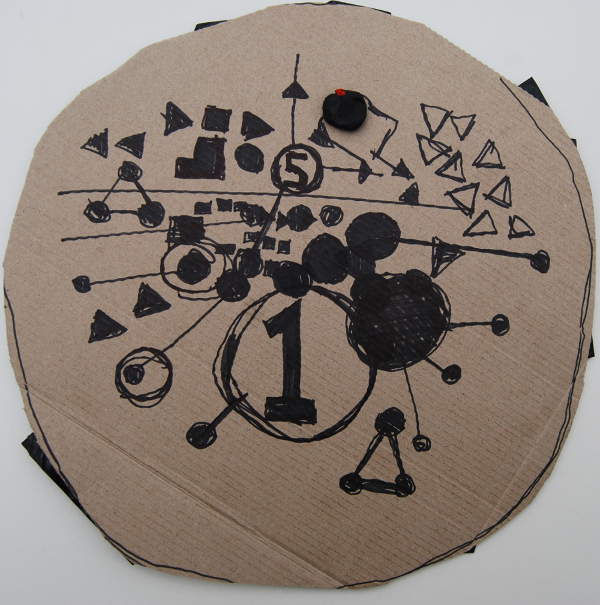
I’m going to show you how to turn this rough “City 01 sketch” I made at the 2016 Edinburgh Mini Maker Faire Imaginary City Workshop. Turn a doodle to 3D render, follow these easy steps…
Edinburgh City Maker Faire 2016
Make this full 3d graphics cartoon style rendering…

imaginary city
As a child, I already did a lot of sketching, particularly futuristic cities. That’s part of my fascination with imaginary cities and why I make workshops about them today.
I wish that when I was growing up in the 80s, I had the powerful graphics and maker tools we have now. However, not to worry now I can achieve exactly what I want to do with all these tools.
Whatever age you are, you can do the same too. Just read on to learn how to turn a doodle to 3D render..
The Quick Process…
Take a quick doodle sketch. This one, I made at the 2016 Edinburgh Mini Maker Faire . This was just a quick sketch without thinking if it would look good…
Maker Faire City
Then, in the 3d application of your choice. Beginners, you can easily knock out a city in a starter application such as Tinkercad link. More advanced users/learners, use 3ds Max, Maya, Blender whatever.
Here I used Blender then switched to 3ds Max. You can see I added a big cylinder without much height and then applied the rough doodle texture on it and made sure it was visible in the viewports.

map reference
After that, it was really just a simple process of adding primitive shapes extruding them, pushing thing up down etc. Being intuitive, always trying to question the shapes and how they relate to the other shapes and the scene as a whole.
Check out this first part video for more information about how I initially worked to turn the doodle to 3D render…
As you can see in this video, I started off the composition with spheres. I then later evolved the scene using tall cylinders and other tower shapes from the drawing. This often happens when you are prepared to evolve your design over time.
Always Upgrade…
After a time, I exported my scene using the FBX file format link into 3ds Max. I often do this, I start out in one application and then put the scene into another.
I wanted to use a line render and in 3dsMax, the mental ray renderer has a nice clean way of doing this using the contour shader. This allows one to get fast “cartoon” type results. Similar render effects can be found in other 3D applications such as Freestyle in Blender. A stylistic cartoon look means that cool looking results can be achieved without having to spend ages texturing each object. Shortcuts are often good things!

Contours in 3dsMax, other applications can achieve this too
Clean lines / clean colors = stylish!
Check out second video here about how I turned the doodle to 3D render…
God Is In The Details…

3ds Max viewport
Here you can see a screengrab from a 3d viewport in 3ds Max. Not only, have I extruded the original shapes. I have included little pieces of funky details.
For example, the 5 on the tallest skyscraper, some simple cylinder antennae structures and also the small chicken coin spaceships link that I told you how to make two blog posts ago.

funky details
Then another nice number five on the top of a red to the left…

funky details 2
These little details add interest and also help to lead the eye in the final composition. Most of the details are top right, the eye is drawn up towards there…

red line composition
Cinematography…
When you have your scene made (mostly :)), you need to frame it if it is going to be a still image, you need to use cinematography (link). As well as the details above, you need to make it look good.

composition decisions
Above, you can see shots using different angles and also camera lenses to get the best composition possible. I wanted to achieve an “above it all” look looking down with the skyscrapers with a perspective looking down.
Post Processing…
Once you are happy, are we ever happy? 🙂 You can setup your render at big render size to allow for large print if so required.
Then hit the render button. This image will be nice. However, there are some great tips and trick to enable you to to upgrade your image in Photoshop of the free application GIMP to make it “sing”…
These can include, dust, film grain, highlighting the main part of the composition with warm colours, adjusting the curves.
This 2D editing is a bit too much to cover in this imaginary city post. I also don’t need to!
Check out the Blender Guru Gleb Alexandrov’s amazingly useful post here about how to make your 3D render sing using 2D post processing techniques.
Here is my final rimage. As you can see, I followed some of Gleb’s really useful tips and added some effects of my own. I also included the original sketch in the composition, a nice bit of original traditional work connecting with 3D digital work “tradigital” just what I like!
imaginary city
Below, you can see the original raw render straight from 3ds Max. When I rendered it out, I thought, hmm nice! However, it is well worth laying down some post processing techniques. At least doing it to see if it makes an improvement. I’m sure you agree, the image that has been post-processed has more bite! Not byte, lol!

Going Further…
As you can see, it is fairly simple to start off with a rough sketch or doodle and then develop and play with it in your 3d application. Evolve it, push it around, work on the composition and then make it “sing” with post processing. You will always be surprised and in wonder with what you come up with.
Summary Of The Process…
- Draw a rough city doodle sketch
- Import the sketch into the 3d application of your choice as a flat reference plane
- Build the scene up by pushing the shapes round, evolving the idea, always “upgrading” the work
- Then render and add some nice post processing to make the image “sing”.
So now it is your turn turn a doodle to 3D renderLet me know any cities of the imagination you come up with using this simple method.
Take the first steps today, look out for more posts. You can also buy my Kindle book here about making an imaginary city using Blender, the free 3D graphics application –

cities of the imagination edinburgh
If you feel that this blog post or my site helps you, consider making a donation so I can continue with in-depth blogs full of useful resources and inspiration for you.
You can donate with bitcoins or on the website Patreon.
Alternatively, you can collect and purchase my art online in my shop.